This week my goal is to create some blend shapes for my facial rig. I will be using ZBrush to create all my shapes and then export them back into Maya.
Maya 2022 Completed Blendshapes
Maya 2022 Gif of Head with Blendshapes
To start off this week I need to export my model into ZBrush. I went back to my original file with my typology I used for my rig to make it easier to work with rather than going into my rigged file. I will be exporting the basic model without the hair. This includes the eyes, and teeth.
Maya 2022 With My Original Typology
To start my process of exporting my model to ZBrush, I cleaned up my scene a little to make it easier. I combined the two eyes together and then combined the upper and lower teeth together.
Maya 2022 Combined Geometry
For this next part I exported the eyes and the teeth separately as an obj. I used the default settings for both of these exports. Before I actually export my model I created some masking on certain areas on the face to help my workflow when I'm in ZBrush. Doing this allows me to manipulate the face but not move areas I don't want to move. I selected the edge in the eyelids and then clicked to faces. I then increased my selection and added a new material to the the selection. I colored it blue so it's easier for me to differentiate my selections.
Maya 2022 Eyelid Mask
I then followed the same steps and created a mask for my lower lip/jaw.
Maya 2022 Jaw Mask
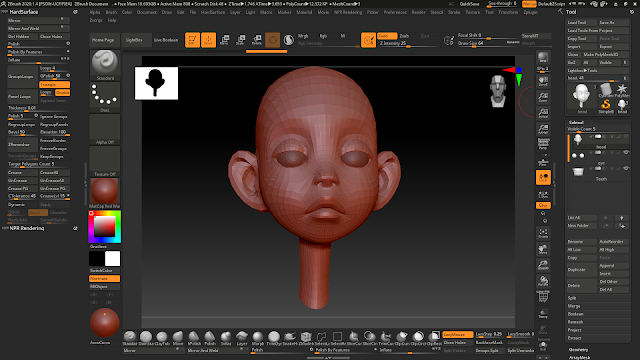
For importing my head into ZBrush I made sure that in my Preferences under Import I had the Import Mat As Groups selected. I created a Polymesh 3D and then imported the head. For the eyes and teeth I appended a 3D star shape and then imported each of them.
ZBrush with Head Model
I then went into Edit Mode and pushed Shift + F to draw polyfill. From my class I learned about the power of ctrl + shift + select for selecting parts of the face to isolate. I then used ctrl to paint over them to create a mask. To make working on the face easier I went up to Transform and turned on Symmetry. I also created some layers to make exporting easier and so I can have many expressions in one file. For the brush I'm using, I'm using the Move brush.
ZBrush File Set Up
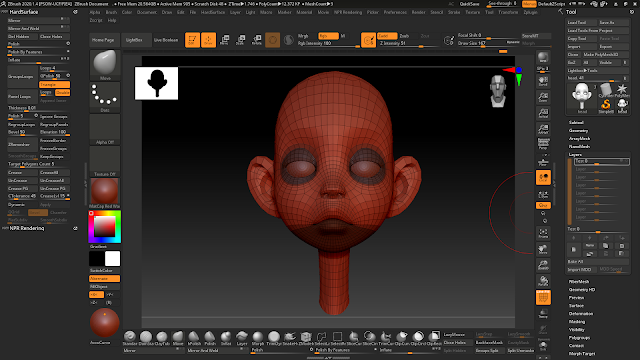
Using the layers I set up, I made sure the innerBrowRaiser layer was set to 1 and was recording. The innerBrowRaiser was the first facial shape I created. I sculpted the face and pulled the inner brow area and the mid area between the left and right brows upwards.
ZBrush InnerBrowRaiser Blendshape
For the outBrowRaiser, I pulled the outer brow area upwards and then smoothed it out a bit so that it was not changing the shape of the head.
ZBrush Outer Brow Raiser Blendshape
I then checked both blendshapes together to see how they look when used at the same time. I tweaked both blendshapes in some spots to make them blend better with each other.
ZBrush Inner and Outer Brow Raisers Used Together
For the Brow Lowerer, I brought in the eyebrows and tried to create a wrinkle. I also moved them down a little bit and tested it with my inner brow raiser. This is a shape I think I could improve.
ZBrush Brow Lowerer Blendshape
For the negative inner brow raiser I focused on the shape of the eyebrows and brought them down towards the eyes. I made mine very exaggerated.
ZBrush Negative Inner Brow Raiser Blendshape
The negative outer brow raiser is more subtle. I sculpted it and then checked it with the negative inner brow raiser and then went back in and adjusted.
ZBrush Negative Outer Brow Raiser Blendshape
For the sad blendshape, I took the inner brow raiser, brow lowerer, and the negative brow raiser and duplicated those shapes. I then merged the duplicates into the sad blendshape. From here I made some tweaks to improve the shape of the brows.
ZBrush Sad Blendshape
For the angry blendshape, I duplicated the brow lowerer and the negative inner brow raiser and then merged them. When combining these two blendshapes at their max, the face did break so I smoothed and tweaked the geometry to create the angry look.
ZBrush Angry Blendshape
Once I got my brow shapes, I began to create my mouth shapes. The first one I worked on was the lip stretcher. When I think about it's movement, I see it moving horizontally. To start my process I created a new layer and unfroze the jaw mask. I sculpted the horizontal movement but also made sure I added a little movement going inwards with the shape of the head. I also added the small details of the nose slightly flaring and the lips getting thinner as they stretch.
ZBrush Lip Stretcher Blendshape
The lip tightener is the opposite of the lip stretcher since I am bringing the lips inwards instead of outwards. With the Pink Haired Girl I have to think about the fact that by design, she already has a smaller compressed mouth. When making the blendshape, I also gave more volume to the lips and made the nose also slightly move.
ZBrush Lip Tightener Blendshape
The lip corner puller is a bit strange on this character because her design is frowny. This shape was the hardest for me to get correct because she did look creepy. I manipulated the corners of her mouth as well as inflated her cheeks. I also moved her mouth up and had her nose flare slightly. Because her cheeks inflate I had to smooth the geometry around her eyelids and cheeks.
ZBrush Lip Corner Puller Blendshape
Because my character is already frowning, I did not go too crazy with the lip corner depressor. I pulled the corners of the lips downwards and then pulled the skin around the cheeks downwards to follow. I also moved the nose a litttle bit and moved the lips downwards. For the top lip I moved it downwards and the bottom lip I moved slightly upwards. This is a blendshape I think I could improve some more.
ZBrush Lip Corner Depressor Blendshape
After getting my mouth shapes I began to work on my lip shapes. The first one I sculpted was the upper lip depressor. I pulled the lips up towards the corners and pulled the skin back so that it moves. I did adjust the middle of the lip so that it does not move with the corners. A separate blendshape will be used to create that. I also tried to make sure that I don't move the nose too much.
ZBrush Upper Lip Raiser Blendshape
Since I created the upper lip raiser, I then worked on the upper lip raiser middle blendshape. To make the middle shape, I left the upper lip raiser blendshape turned on and on it's own layer I moved the middle part of the lip upwards so that it created a more square shape with the corners. This is used for making the face look angry.
ZBrush Upper Lip Raiser Middle Blendshape
For the nose wrinkler blendshape, I left the upper lip raiser and the upper lip raiser middle blendshape turned on. On it's own separate layer I sculpted the shape. I mostly pulled the corners of the nose upwards and then created a wrinkle with the geometry right behind the nostrils. I also moved the nose slightly upwards.
ZBrush Nose Wrinkler Blendshape
Since the lower lip depressor works with the lower lip and not the upper lip or head, I unfroze the jaw area and then froze the head so that it would not move. I made this blendshape a bit extreme. I mostly pulled down the lips on the side and smoothed out the geometry. I moved some of the geometry under the lips to give some movement. I also very slightly moved the middle of the lower lip.
ZBrush Lower Lip Depressor Blendshape
Similarly how I worked on the lower lip depressor, on it's own layer I unfroze the jaw geometry and then froze the head geometry for the middle lower lip depressor. I left the lower lip depressor turned on so I can properly blend the two lip depressors together. I moved the middle of the lip downwards and tried not to flatten the middle of the lip too much. I also adjusted the lip depressor blendshape after I got the middle lip depressor where I wanted it to be.
ZBrush Middle Lower Lip Depressor Blendshape
For these next two blendshapes I worked with the cheek area. For the cheek puff I pulled the cheeks outwards. I adjusted the masks around the characters eyes and jaw so I could move the geometry in those areas slightly. For this blendshape I had to be careful about moving the eyelids, nose and mouth too much. After doing some research I found a video from FlippedNormals on Youtube about
Erasing from Layers in ZBrush. Using the technique shown in the video I was able to adjust the geometry around the mouth, nose and eyelids after creating the cheek puff shape so it is less influenced. I smoothed out the geometry after erasing on the layers so it looks more blended.
ZBrush Cheek Puff Blendshape
The last blendshape I created was the cheek suck blendshape. I went closer to the lips and brought the cheek geometry inwards. I then adjusted the jaw mask a little bit to move the geometry in that area. I also tried to make sure that there looked like there was a cheek bone. Using the erasing from layers in zbrush technique I made sure that the lips where untouched by the geometry being moved around. To get some extra tweaking on this blendshape I turned on the lip tightener blendshape and moved the geometry around the lips to better blend those two blendshapes.
ZBrush Cheek Suck Blendshape
After I created all my blendshapes, I brought them into maya using the FBX exported in zbrush. Once I brought the blendshapes in I tested them out on my rigging head to see how they were working. Overall this had been my first real experience creating blendshapes for a facial rig. I really enjoyed this process and it does takes a lot of time. There is so much more for me to learn about blendshapes and with more practice the blendshapes will only improve!