Monday, January 31, 2022

Jaw Pivot - Good Way To Figure Out Where This Joint Should Be and The Effects You Get

 It's been a while since I have worked on this project.  Sometimes life gets a bit crazy and this is a project I am picking back up. When I was creating my joints for my jaw pivot, I learned something I didn't really think about too much.  I think about anatomy a lot when I work on a character by looking at several real life skeletons and looking at animation.  With the jaw pivot, the whole idea of where it can be placed to get different effects really got me thinking.  

When I placed my joints, I placed it based on realism.   I placed my jaw hinge joint close to the ear and close to where the neck would be connecting to the skull.  It's very similar to a drawing my instructor did in class.

Autodesk Maya 2022 Joint Placement

Drawing from Facial Rigging Class

A really interesting point about the jaw hinge that I learned is that they don't always just rotate.  They will also translate a little bit when it gets to a certain point.  For more realistic rigs, you can leave rotation and translation turned on so that it is easier for the animators.  Animators can adapt it a little bit.  I also learned that with realistic facial rigs you can create the jaw open with shapes and the motion would be build in.  

Cartoon rigs are different from realistic rigs because the design of the character will become a consideration on how you want them to move.  They may have a very long nose like Goofy or very long fingers.  This same idea applies to the jaw.  Where you place your jaw hinge will give you a different effect for how the jaw moves.  An example I looked at was if you wanted your jaw to move almost vertically, your pivot would have to very far away so that when you rotate it would move more vertical.  

Example of Jaw Hinge for Vertical Movement

Another example that was looked at is if the character was designed to have a very sharp rotation.  The pivot point would actually move further way from the ear and closer to the jaw.

Example of Jaw Hinge for Sharp Rotation

A cool trick that I tried for visualizing how the pivot is going to act is to bring a cylinder into the scene and then rotate it 90 so that it's on it's side.  You would be looking at the vertices that create the center of the cylinder.  Then bringing it up into the head geometry and turning on xray.  You can use the center, scale and place it where you think you want to put your jaw hinge joint.  Tip:  The more subdivisions you have the smoother it looks.  Then rotate the cylinder, this will give you an idea as to what kind of effect you will get. 
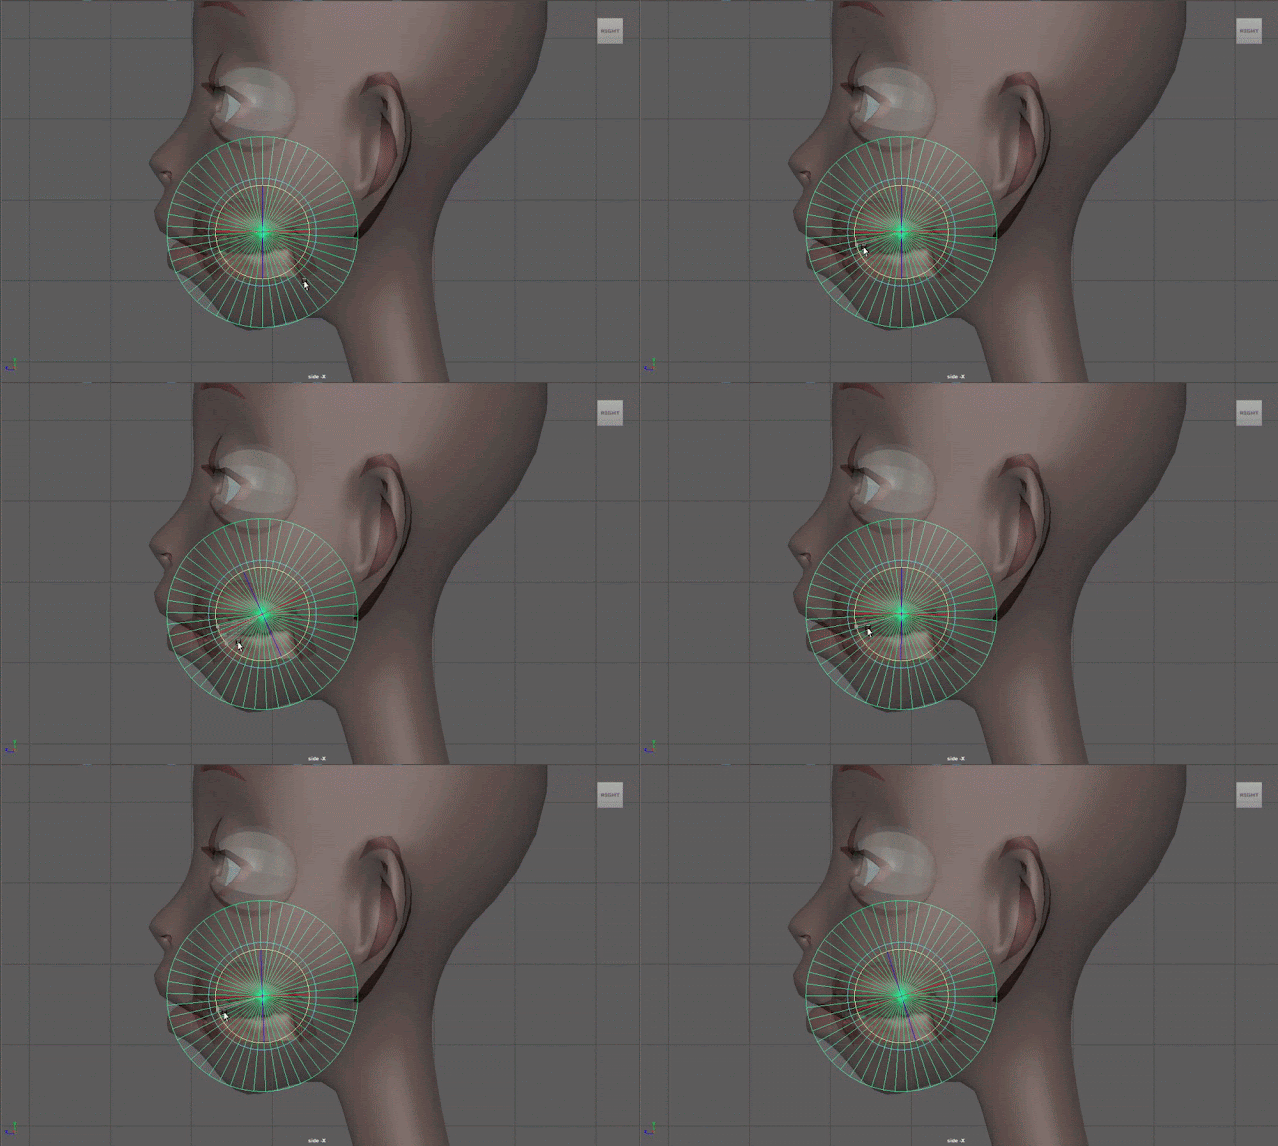
Gif Example of Sharp Rotation

While I haven't had the experience of creating a rig with a vertical movement or a sharp rotation, I found this to be very interesting and hope I can create a rig with these effects in the future!

Tuesday, January 25, 2022

Resetting Transformations, Freezing Transformations, and Matching Transformations in Autodesk Maya

 When working in maya you may use several transformation tools to help with your workflow.  The three translation tools I want to talk about are the resetting transformations, freezing transformations and matching transformations.  These three tools are very powerful and help you work in maya in many different ways.  I used these tools in my school days a lot and still do on the daily.  

Resetting Transformations is a tool that put your manipulator tool back at the origin in maya.  So back on the center of the grid.  

How to reset transformations:

  1. Select an object you want to reset the transformations on
  2. Go up to Modify 
  3. Select Reset Transformations
Autodesk Maya 2022 Reset Transformations Tool


Freezing Transformations tells maya that the point where the object is, is the origin.  So if you move the object you can zero out the transformation, scale, and rotation and it will go back to where you froze.

How to freeze transformations:

  1. Select an object you want to freeze transformations on
  2. Go up to Modify
  3. Select Freeze Transforms. 
Autodesk Maya 2022 Freeze Transformations Tool

Matching Transforms is a tool that I learned recently from a friend of mine at work.  Matching transforms copies the translations from one object to another.

How to match transformations:
  1. Select the object you want to transform and then the target you want your object to match.
  2. Go up to Modify and scroll down to Match Transforms.
  3. On the side pop-up you can select a variety of ways you can have your object copy the transforms
    1. Match all Transforms
    2. Match Translations
    3. Match Rotation
    4. Match Scale
    5. Match Pivot

Autodesk Maya 2022 Match Transformation Tool.

Each of these tools are incredibly powerful and helpful when working in maya.  If you are a tech artist, you may recognize that each of these tools utilizes different matrix. 

Tuesday, January 18, 2022

Maya 2022: Unable to Playblast using Quicktime and H.264

If you are someone who has used maya for a few years you may have noticed some changes to maya 2022 and maya 2020.  One of the changes I have come across when playblasting my dance animation to Kiss and Make Up, is that QuickTime is no longer an option in the playblasting options.  If you are newer, you would find the quick time option under format in the playblast settings and H.264 disappears from the encoding setting.  These settings are easy to get back but it does require installing QuickTime.  Quick note, I have found this issue on both PC and Mac computers.

To get the QuickTime option back is very simple.

For a PC:

  1. Start off with maya closed.  It needs to be closed because we need to install quicktime.  
  2. You need to visit the Download Quick Time page.  This download is on an apple support page and is only for PC.
  3. Push the big download button on this page and install quick time.  
  4. Open maya and check both your playblast settings format and your render settings
For a Mac:
  • You need to follow the same steps above but you need to visit Quicktime Downloads by Apple support.

Maya 2022 Playblast Settings with QuickTime and H.264

Thursday, January 13, 2022

Kiss and Make Up Dance Pass4

Autodesk Maya 2022 Kiss and Make UP Animation Blocking Stage 4

Autodesk Maya 2022 Arnold Renderer Single Frame Render Test

This is an animation I started while I was in grad school but never got to get past the blocking stages.  This is very early stages of this animation as this is my fourth pass at blocking in all of the movement. I chose to do dancing for a high action animation because choreography has always fascinated me with the way the body moves to the music.  Dancing doesn't always make sense to me and I myself am not very confident about dancing.  When I first started learning animation, I did an animation with one of my best friends to this same song and reference video.  We both animated a character and brought them together.  This was one of my favorite memories from school.  This dance variation is further in the video.  The song is Kiss and Make Up by Black Pink and Dua Lipa.  The choreography reference is from 1MILLION Dance Studio on Youtube.  The rig is called Zio by Hernan Ares. 

Naming Conventions in Autodesk Maya

 When I was first learning maya, my classmates and I messed up the naming conventions a lot.  Especially when we were leaning animation and tried to bring reference into the maya scene.  I have spent hours troubleshooting why my reference won't appear in maya to learn that it was simply because it did not like what I named all of my tiffs. 

So what does maya not like in naming conventions? It's very simple once you know what to use and what not to use. 

  1. DO NOT have slashes.  PC and One Drive do not like slashes and it will not sync
  2. ONLY use underscores!
    1. Quick note about underscores, some maya naming conventions cannot have underscores either such as bringing in an image sequence.
      1. For image sequences use something like this: Project1ref
  3. NEVER name an objects or cameras Render.  This is more for in your actual maya scene but if you name something Render and you go to render your scene it will crash.  This happens because the code to render gets confused since it uses render to render.

Scaling Your Controllers when they are Connected

 Sometimes when you are working on a rig, you may need to go back and adjust your controllers size a little bit.  This is possible without b...