For this week I worked on getting the base/main part of my facial rig. I created the jaw pivot, skeleton layout, control layout and a first skinning pass.
Gif of Maya 2022 First Facial Rig Pass
Before I started rigging, in the class we make a plan on how we are going to rig the face. The first part of the plan was a create the skeleton and the controls. The skeleton would be for the neck, head, ears, nose, nostrils, upper and lower gum and the tongue. Once we get the joints in, then the controllers are built. The model shapes are then looked at, especially for the eyebrows on the model I used. Model shapes will be used on the mouth and lips too. After modeling the shapes, I'm going to use Zbrush to connect my shapes and then bring it over to Maya and work with symmetry. Controls will be used for the shapes. I also will be building an extra mouth control set up that will move the whole mouth around.
For the eye set up, there will be an eye look rig. The eyelids will also have their own rig and a fall off for when you move the eyes. Another lip and eyebrow rig setup will be created. I'm also going to explore some extra deformation with deformers and then I'm going to test the rig. Through out the process of creating this rig some animators will be looking at it and seeing if they can break it and where I can improve.
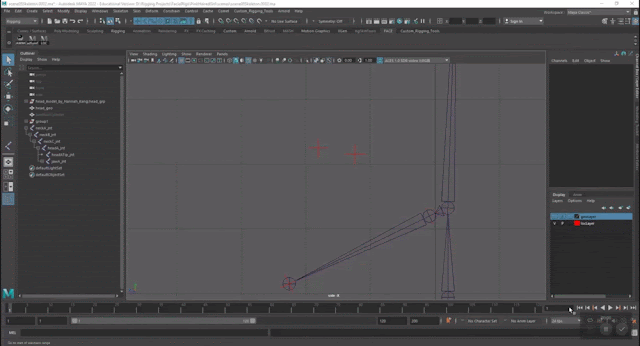
To start the process of actually rigging, I wanted to get the jaw pivot correct. I had a little bit of difficulty with this on the first facial rig I created. I learned about a strategy to help determine where to put the jaw pivot joint which is to put a cylinder in the face and then rotate it to get an idea on how it will move. I placed my cylinder around the ear.
Maya 2022 Cylinder Used to Determine The Location of The Jaw Pivot
Once I got the placement of the cylinder I created a locator and used a parent constraint with maintain offset turned off to put it in the exact location the cylinder is. I then deleted the constraint and hid the cylinder. I made the local scale bigger to see the locator better and then rotated it towards the edge of the lip for jaw reference.
Maya 2022 Jaw Locator Pivot Reference
My next big step in this process is to get the joint placement for my skeleton. To start this I am going to create some locators that the joints will snap and orient to. I duplicated the jaw pivot locator and moved it to the edge of the lip. I also placed the left eye locators with a small mel script. To keep my scene organized I created two layers, one for the locators and another for the geometry.
Maya 2022 Creating Layers and Joint Locators
I then began to create the skeleton. I first placed the joints in the neck and the head. After some adjustments to the placement I created a naming convention and then began to create the joints on the jaw and the left eye. I snapped the joints to the locators and then connected them to the head.
Gif of Maya 2022 Snapping joints to the locators
Maya 2022 Jaw and Eye Joints Connected to Head Skeleton
I then began to place the nose and left ear joints. After adjusting them I connected them to the head skeleton.
Maya 2022 Nose and Left Ear Connected to Head Skeleton
After getting my skeleton placed, I checked the orientation of the joints and fixed the ones that were pointing in the wrong direction. I also did a rotation test on the head and neck to make sure that it was moving correcting when rotating together.
Maya 2022 Orienting Joints
I then worked on mirroring the joints. For most of them I mirrored with the behavior setting so that the joints act as if they are mirrored. For the eyes I mirrored them with the behavior setting and then fixed their orientation so that they act as if I mirrored with the orientation setting.
Maya 2022 Mirroring Joints
One of my favorite parts of rigging is creating the controllers. I created the main, secondary main, and neck controllers. I used my own controller generator tool that I scripted in Python and the Comet tool to quickly create some simple controllers and put some colors on them.
Maya 2022 Neck Controllers
Once I got my neck controllers, I created the head, jaw, nose, tip of nose, and ear controllers. I like to color code my controllers. Middle controllers are green and yellow while controllers on the left side of the face are blue and variations of blue. On the right the colors are red and variations of red.
Maya 2022 Head, Jaw, Nose, Tip of Nose, and Ear Controllers
I next got some of my smaller controllers in which are for the nostrils, tongue and teeth. Once I placed the controllers I parented them under their respectful parents to make them follow the correct controllers when opening and closing the mouth. With that I have all the main controllers created with the exception of creating my eye controllers.

Maya 2022 Main Controllers
At this point I add my constraints to my controllers and clean up their channel box attributes. I used parent and scale constraints.
Maya 2022 Gif of Controllers Moving Joints
Now that I got my joints connected to my controllers, I'm beginning my first pass at skinning. I hid the everything except the head geometry so I could focus on just the head. I then animated the controllers so that while I'm skinning I can see how it looks.
Maya 2022 Gif of Animated Controllers for Skinning
I then skinned the mesh to the joints I selected. I also at this point went back and fixed a joint in the neck that I thought needed to be improved. Once I played back my animation I saw how the mesh was moving. There is a lot of work ahead to make this skinning look good!
Maya 2022 Gif of Default Skinning
For my process of skinning, I started it off by blocking in the weights. My first step for fixing the skinning was to use the paint skin weights tool and destroy the default skinning by flooding the skin weights on the first neck joint. The whole head is set to one on the first neck joint (whole head is white). Then I selected the edges that will be effected by my second neck joint and then pushed to vertices so that I had the vertices selected. Going back into the paint skin weights tool I then selected the second neck joint and pushed flood. In the area that I had the vertices selected, the skin weights moved to the second neck joint.
Maya 2022 Moving Skin Weights to Other Joints
I repeated the same steps to skin the head. I took all the vertices that weren't skinned to the neck and skinned them to the head. I then manually skinned some vertices to the third neck joint.
Maya 2022 Manual Skinning on Neck Joint 3
For the jaw I selected an edge that was in the middle of the lips and then pushed to vertices. I then used shift + . to increase my selection. From here I flooded my selected vertices to the jaw joint and tested it in the animation. It looks better but will need some blending and smoothing. I manually added some more influence to the jaw and then mirrored it
Maya 2022 Jaw Skinning Animation Test
For the ears I manually painted the weights on and tested it in the animation. I then mirrored it for the other ear.
Maya 2022 Left Ear Skinning
I did the same thing for the nose, nose tip, and the nostrils. I then mirrored and tested the animation. After seeing the animation I went back in and improved the nostril skinning.
Maya 2022 Gif of Nose Animation Skinning Test
I worked on the neck a little bit to smooth it out. I manually painted edge loops between neck joint one and neck joint to blend them.
Maya 2022 Blending The Neck Joints
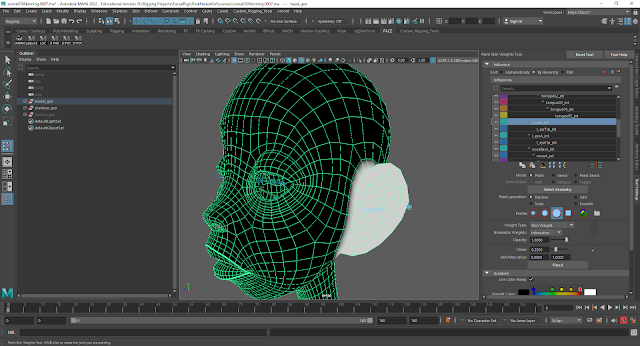
I began to smooth out my skin after blocking in the skin weights. I worked on the jaw first and used NgSkin tools to smooth out the skinning.
Maya 2022 Smooth Skin For Jaw
I also worked on the skinning by the ears and the cheeks to move a little bit when the jaw opens. The skinning under the jaw as it opens wide also got smoothed out a bit but I will be adding correctives to make it look better when opening the mouth wide.
Maya 2022 Smooth Skinning on Cheeks and Under Jaw
Continuing to work on the skinning, I smoothed out the neck, ears, nose, nose tip, and nostrils. These followed the same process of using NgSkin tools and skinning manually. Also referring back to the animation and mirroring the weights.
Gif of Maya 2022 Smoothed Facial Skin Weights
Once I smoothed out the skinning on my head, I just have the eyes, teeth, and tongue left.
Maya 2022 Eyes and Teeth
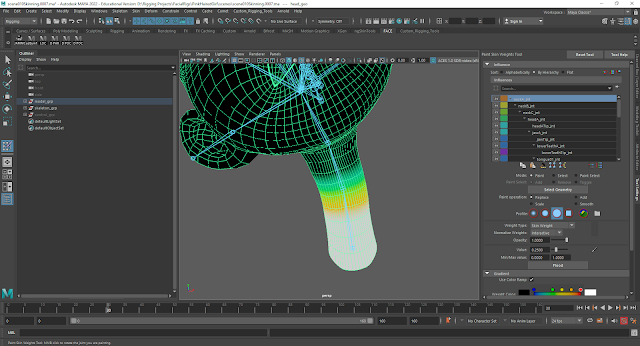
For the eyes and the teeth I simply parent and scale constrained them. It's a little bit faster than skinning them so that is what I did for now. The tongue I did skin to the tongue joints and then did some smoothing.
Maya 2022 Tongue Skinning
From here I unhid all of the geometry to see all parts of the face stating to come to life!
Gif of Maya 2022 Skinned Face and Joints


No comments:
Post a Comment